A leaky tap can waste a significant amount of water, costing both money and resources. For instance, a single dripping tap can waste tens of thousands of litres of water annually, according to The Guardian. Even a slow drip can add up to about 2,000 litres per month, as noted by Hobart City. As a homeowner in Tasmania, this can quickly translate into wasted water and higher utility bills.
Fortunately, leaking tap repair is often a straightforward task that doesn’t require expensive tools. Basic equipment, such as an adjustable wrench and a few screwdrivers, is usually sufficient. Additionally, you’ll need a replacement part, typically a small rubber washer or O-ring, which can be found at most hardware stores like Bunnings for just a few dollars. According to plumbing guides, leaking tap repair is something most homeowners can do themselves with just a little effort and the right parts.
Why Leaking Tap Repair Matters
Even tiny drips matter. Every drop adds up on your bill and to Tasmania’s water consumption. A persistent leak not only drives bills sky-high but can damage cabinets or floors with water stains. Municipal guides remind us that dripping taps waste around 2,000 L a month that’s like leaving a tap on all night for a month! By doing leaking tap repair promptly, you’ll save water, money, and headaches. It’s also good karma for the planet.
- Save water and money: Stopping drips conserves water and cuts bills.
- Avoid damage: Fixing leaks prevents mold, stains, or warped wood under sinks.
- Quick fix: Most fixes cost only a couple of dollars (new washers/O-rings) compared to hundreds for a plumber call.
Signs of a Leaking Tap
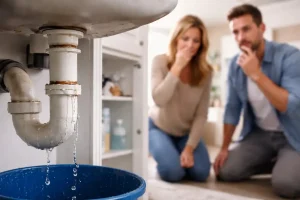
Leaks can be sneaky, but your eyes and ears give them away. The most obvious sign is hearing a drip or seeing steady drips. You might notice water pooling or stains around the base of the tap or under the sink. Keep an eye on your water meter: if it ticks when everything is off, there’s a leak. Unexplained spikes in your water bill are another clue. Trust your senses and instincts here – catch a leak early, and leaking tap repair will be a breeze.
- Dripping sound: A steady drip… drip… when the tap is off.
- Water stains/puddles: Damp spots near the tap or under the sink cabinet.
- High water bill: An unexplained jump in usage often means a hidden leak.
Tools & Materials Needed for Leaking Tap Repair
Before you start, gather a handful of basic tools and supplies – no plumbing degree required. For example, you’ll need:
- Adjustable spanner
- Flat-head and Phillips screwdrivers
- Replacement washers or O-rings
- Needle-nose pliers
- Plumber’s tape or grease
- Cloth or small bucket
These items are usually available at any local hardware store (remember, Bunnings isn’t far!). One repair blog notes that “you can tackle leaking tap repair independently with a few basic tools” – which is exactly what we’ve assembled here.
Understanding Common Tap Types
Different taps have different innards, so knowing your tap type helps. The table below shows common household taps, what usually goes wrong, and how tricky it is to fix:
Tap Type | Common Leak Cause | Repair Difficulty |
Compression (washer) tap | Worn or torn rubber washer | Easy – just replace the washer |
Cartridge (mixer) tap | Worn internal seals or cartridge | Moderate – may need to swap the cartridge |
| Ceramic-disc mixer tap | Cracked discs or debris in valve | Hard – often requires new cartridge |
Traditional compression taps usually drip because their rubber washer is shot. Modern cartridge or ceramic-disc taps have seals or discs that can fail. Our step-by-step fix will cover the common compression type, the most frequent leak culprit.
Step-by-Step Guide to Leaking Tap Repair
Follow these steps carefully. Take your time, work methodically, and you’ll have that tap fixed before you know it:
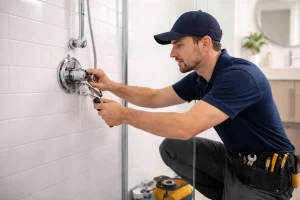
- Shut off the water: Locate the isolation valve under the sink (or the main water valve) and turn it off.
- Open the tap: Turn the tap on and leave it open – this drains the lines so the worst of the water runs out.
- Remove the handle and cover: Pry off or unscrew any decorative cap on the tap. Then loosen and lift off the handle. You may need to remove a small screw or nut to access the tap body.
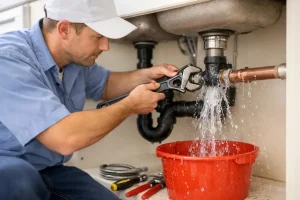
- Replace the washer: Once the handle and cap are off, you’ll see a threaded stem. At its base sits the rubber washer. Use pliers to pull the old washer off. Align a new washer of the exact size on the stem and press it firmly into place.
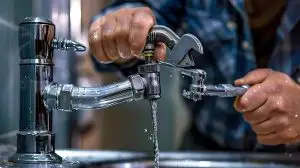
- Reassemble the tap: Put all the parts back in reverse order. Tighten nuts and screws snugly. Turn the handle back on, then turn the water supply on. Carefully check around the tap: if no water leaks out, you’ve nailed it
This rubber washer is often the leak culprit. Once the tap is open, use pliers to remove the old washer and slide the new one onto the stem. A dab of grease or plumber’s tape helps it seat smoothly. Then reassemble the tap and turn the water back on to make sure the leak is gone.
These steps echo standard advice from plumbing pros, so you’re in good hands. If, after reassembly, water still leaks, double-check the washer’s fit and make sure no debris is caught in the valve seat.
Preventing Future Leaks
Congratulations, the leak is fixed! To keep it that way, consider these preventative tips:
- Gentle operation: Don’t slam tap handles. Turn them gently but firmly – this preserves washers and O-rings.
- Regular checks: Inspect taps for drips once in a while. Catching a worn washer early means easy repairs next time.
- Clean aerators: Unscrew and clean tap nozzles occasionally. Mineral deposits can force you to tighten taps harder, which damages parts.
- Balanced pressure: If you have very high water pressure, it can wear out taps faster. A pressure regulator can help extend tap life.
- Use correct parts: Always use the right-size washer/O-ring. Keep a spare set in your toolkit for next time.
Tasmanian councils even encourage these simple steps as part of saving water around the house. A little care and maintenance now means fewer leaks later.
When to Call a Professional
DIY leaking tap repair covers most household cases, but sometimes it’s best to call a plumber. If your tap still leaks after a new washer, or if your tap has unusual mechanisms, don’t hesitate to get expert help. A licensed Tasmanian plumber can reseat the valve or replace broken parts safely. In short, tackle what you can, and call a pro if the job goes beyond a simple washer swap.
Conclusion
Leaking tap repair doesn’t have to be a headache. With the right tools and steps, you can fix that dripping tap yourself, saving water, money, and the sound of midnight dripping. We’ve covered everything from spotting leaks to swapping out washers, so you’re ready to give it a go. If you need further assistance, you can always reach out to Tasmanian Government plumbing services for expert help. If you found this guide useful, share it with friends or family who might benefit. And if a leak ever puzzles you, remember: turn off the water, gather your tools, follow these steps, and you’ll soon hear silence again. Happy fixing!