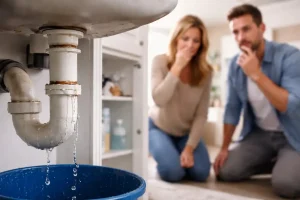
Dealing with a leaking shower repair in your Tasmanian home can be more than just an inconvenience; it can lead to significant water damage and higher repair costs if not addressed promptly.
As the weather in Tasmania can vary from one season to the next, it’s essential for homeowners to stay proactive when it comes to maintenance and repairs. A leaking shower may seem like a minor issue at first, but ignoring it could cause issues like mold growth, rotting wood, or structural damage. This article will guide you through the best practices for dealing with a leaking shower, ensuring a safe and effective repair process.
In order to ensure a safe and efficient repair procedure, this article will walk you through the best practices for handling a leaking shower.
When it comes to leaking shower repair in Tasmanian homes, homeowners need to consider several factors that might be causing the issue. The first step is identifying the source of the leak, whether it’s from damaged seals, cracked tiles, or faulty plumbing. Often, minor wear and tear or poor installation techniques can trace the cause, so it’s essential to thoroughly inspect your shower.
With the right tools and knowledge, many homeowners can manage some repairs on their own. However, certain situations may require professional assistance to prevent further damage or ensure a lasting fix.
In this guide, we’ve compiled the top 9 tips for leaking shower repair that will not only help you fix the issue efficiently but also prevent it from recurring. Whether you choose to tackle the project yourself or seek expert help, these practical tips are sure to save you time, money, and frustration. Stay ahead of the problem and learn how to keep your bathroom dry and damage-free.
1. Spot the signs of a leak early
First, play detective. Look for common clues that your shower is misbehaving. Is paint peeling or bubbling on the bathroom walls? Are tiles cracked or lifting? Do you smell a musty odor or notice mold in corners? Have you seen watermarks on the ceiling below the bathroom? These are classic warning signs. Even a tiny, hard-to-notice drip can create damage over time. For example, Megasealed Tas (bathroom leak experts) warns that water creeping between tiles can lead to rot, mold, and even structural damage.
- Look below: Check the ceiling of the floor downstairs. Damp or discoloured spots there often mean an upstairs shower is leaking.
- Visual clues: Peeling paint or cracked tiles inside the bathroom are big red flags. Don’t ignore them!
Catching a leak early saves a ton of hassle later. The sooner you fix it, the less water will seep in and the less damage you’ll face. Even a slow drip can waste thousands of liters annually, which is a significant financial loss!
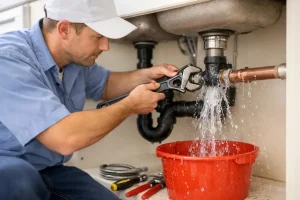
2. Test Your Shower Base (Water Leak Test)
Once you suspect a leak, the next step is pinpointing where it’s coming from. One of the simplest tricks is a water test for the shower base. Here’s how to do it: Block the drain with a watertight plug or tape, then fill the base with a few centimeters of water. Mark the water level with a waterproof marker or tape.
Wait 30–60 minutes and check: if the water level has dropped, you know the leak is through the base itself
This test confirms a floor/tray leak. If the water stays put, the leak may be in the shower walls or plumbing fittings instead. Try running the shower and checking for drips around the faucet or valves to find leaks behind the wall. Sometimes removing an access panel or shower trim can give you a view of the pipes.
One tip: turn the shower on and watch the pipes with a mirror and flashlight even a tiny pinhole leak will show up as a wet spot. Identifying these issues early on is crucial for effective leaking shower repair, as it helps pinpoint the exact source of the problem before it worsens.
In short: Water-test the base to see if the leak is underfoot. This simple DIY step helps you decide your next move.
3. Replace Worn-Out Seals and Caulk
If you found the leak is coming from the edges of the shower floor or where walls meet, old caulk (sealant) is often to blame. The silicone or grout around a shower is constantly wet and can shrink, crack, or peel away over time. When seals fail, water sneaks through those tiny gaps.
How to reseal:
- Use a putty knife or scraper to remove all the old sealant. Get into corners and smooth edges until only clean surfaces remain.
- Clean and dry the area thoroughly—moisture or soap residue will stop new sealant from sticking.
- Apply a fresh, high-quality waterproof silicone sealant (seek products labeled for baths/showers). Run a neat bead along the joints where the floor meets walls or edges.
- Smooth the bead with a wet finger or tool, and let it cure as per instructions.
This fix is usually easy and cheap just a bit of time and a tub of silicone. Make sure your work is neat, because even a small miss can let water through. Ensuring proper sealing can effectively halt a leaking shower repair. By paying attention to the details and making sure all seals are in place, you can stop the leak before it becomes a larger issue.
In case you’re tackling multiple bathroom jobs, remember similar logic applies to other drips: e.g. a dripping faucet repair often comes down to a loose aerator or a worn washer, just like leaking shower repair often comes from loose seals.
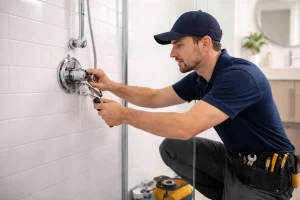
4. Check and tighten the shower fixtures
A leaky shower isn’t always just a cracked tile or bad caulk. Occasionally the culprit is something as simple as a loose showerhead or valve. Over time, fittings like the shower arm or faucet can work themselves loose, or their washers can wear out.
These seemingly minor issues are often overlooked but can contribute to larger problems, requiring proper leaking shower repair to avoid more significant damage.
- Showerhead and arm: Turn off the shower, then try tightening the showerhead by hand or with a wrench . If it’s really stuck or cracked, unscrew it and replace the worn rubber washers or the head itself.
- Shower faucet or mixer: A dripping mixer might mean the internal cartridge or O-rings are shot. If you’re comfortable, shut off the water, dismantle the tap, and swap in a new cartridge/seals. Often these parts cost only a few dollars. A simple leaking shower repair like this can be a quick fix if you’re handy.
Quick fixes like tightening fittings and replacing washers are common; one plumber’s guide notes that snugging up loose connections and changing old washers can fix many leaks. Essentially, what works for a dripping kitchen tap works here too: ensure all nuts are tight and rubber seals are fresh. If you encounter issues beyond that, they could indicate a more serious crack or joint leak, so be vigilant.

Tip: While you’re tightening the shower, look around the whole bathroom. A dripping sink faucet is often fixed the same way, and getting a sink faucet repair done means no more wasted drips outside the shower. It’s a good time to check everything!
5. Inspect the Shower Tray or Base
Should sealing and fixtures fail to resolve the issue, the shower tray itself may sustain damage. Older or cheap trays can crack under heavy use. Even tiny hairline fractures allow water to escape.
Signs of a cracked tray: water pooling outside the shower, persistent damp spots on the subfloor, or visible cracks in the tray or tiles. If you find even a small crack, assess it:
- Minor cracks or chips: There are repair kits (epoxy or resin) for shower trays. These can patch small breaks and stop leaks. Follow the kit instructions carefully.
- Major damage: For big cracks or broken trays, repair might be temporary. You may need a new shower tray installed by a professional. This can be an extensive job (lifting tiles or removing the old base), so consider if a replacement is worth the cost for your situation.
Quick Reference: Common Leak Fixes
|
Issue |
Signs | DIY Fix / Note |
|
Worn Silicone Sealant |
Gaps or missing caulk; water at edges |
Remove old sealant & apply new waterproof silicone. Ensure area is dry. |
| Cracked Shower Base |
Visible cracks; water escaping; floor wet outside |
Minor cracks: use a shower repair kit. Major: replace the tray (may need pros). |
| Loose Shower Fitting | Dripping shower arm/tap; leak from valve |
Tighten fittings, replace worn washers/O-rings, then test shower again. |
Table: Typical causes of shower leaks, how to spot them, and easy fixes
6. Check for Hidden Leaks Behind the walls
Sometimes the leak isn’t on the surface at all but behind your tiles. A faulty valve or pipe behind the shower wall can drip slowly into the wall cavity. These are sneaky and often only spotted by subtle clues or after checking behind a panel.
Look for moisture seeping into walls, persistent mold above the shower, or water dripping inside adjacent cupboards/walls. If you suspect it, a helpful trick is to remove the shower faceplate (escutcheon) at the valve. You might see water spraying from pipe joints when the shower runs. If that’s inconclusive, you might carefully take out a small section of the wall.
In short, if your bathroom ceiling has stains or the shower leak ‘acts up’ only sometimes, the problem could be behind the wall. If you do open things up, turn off water at the mains first! And remember: any major behind-wall work usually needs a plumber.
7. Dry Out and Prevent Mold
After fixing the leak, dry everything thoroughly. Water left sitting will invite mold and mildew, especially in Tasmania’s damp climate. Keep the bathroom well-ventilated: open windows or run an exhaust fan to air it out.
Quick mold tip: Clean any black or green mold with a vinegar solution or gentle bleach mix. Make sure walls and grout are fully dry before sealing again. Fixing leaks promptly is half the battle against mold health experts advise that repairing plumbing leaks and airing the house are key to mold prevention
8. Know When to Call the Pros (Licensing and Regulations)
Some jobs just need a licensed plumber. If your leak repair involves cutting tiles, digging up floors, or anything beyond tightening a fitting, pause and consider professional help.
In Tasmania, even low-risk plumbing work is expected to be done by a licensed plumber. That includes serious shower repairs or replacing the main shower unit. Plumbers know local building codes and will ensure your work is compliant. They also have the right tools for things like pressure testing the lines.
If at any point you’re unsure say, if you find corroded pipes, or the wall behind the shower needs rebuilding it’s wise to ring a pro.
A friendly tip: ask for plumbers who are certified and can provide references. According to Tasmania’s building authority, plumbing work must comply with national standards and often requires a licensed professional. This seal of approval ensures that the job is completed correctly and safely.
9. Inspect Other Bathroom Plumbing (Prevent Future Leaks)
While you’re knee-deep in repair, do a quick audit of related fixtures. Making a quick audit of related fixtures can help prevent future leaks. Here are a few things to check:
- Toilets: Look at the base and tank. If a toilet rocks or leaks at the seal, consider scheduling a toilet installation. A properly installed toilet won’t leak at its base.
- Sink and taps: Any drip-drip from your sink should be fixed. If your sink faucet is leaking, call in a repair service for your sink faucet—often it’s as simple as a Replace the washer or O-ring. The methods are much like shower fixes.
- Pipes and drains: In older homes, cracked drain pipes under the floor or long sections of corroded pipe can cause mysterious leaks. Nowadays, pipe relining services let professionals repair underground leaks from the inside, without digging big holes. If you notice sink drains or shower drains backing up or wet spots in the floor, ask a plumber about relining.
By taking a holistic approach, you not only fix the shower but prevent other plumbing problems. Think of it as a spa day for your bathroom: time to pamper all your pipes!
Conclusion
Managing a leaking shower in Tasmania doesn’t have to be a daunting task. By acting fast and following these tips, you can keep your bathroom dry, save on your water bill, and avoid the extra cost of major repairs. Start by spotting the signs early, use simple tests to locate the leak, and apply targeted fixes.
Remember that Australian standards (AS 3740) require showers to be properly waterproofed, so taking care of the waterproofing layer is key. If the job gets tough or beyond DIY, don’t hesitate to hire a licensed plumber—Tasmanian law actually expects a pro for many plumbing tasks. You can consult the Master Plumbers Association of Tasmania for expert recommendations on licensed professionals who meet industry standards
Now it’s your turn: grab that silicone tube or make the call—and wave goodbye to that leaky shower! Stay dry, Tasmania!
For authoritative guidance, see Tasmania’s Consumer Building and Occupational Services (CBOS) on plumbing standards here.
Frequently Asked Questions (FAQs)
-
Why is my shower still leaking after I replaced the sealant?
Sometimes the leak isn’t the sealant. Check for cracks in the tray or hidden pipe leaks. Also ensure grout/tile joints are intact—water might be getting through there. If it persists, a pro plumber might need to pressure-test the system.
-
Can I fix a leaking shower myself, or do I need a plumber?
You can resolve minor issues like cracked silicone or loose fittings yourself. However, to comply with Tasmanian regulations, a licensed plumber should perform any major work such as tile removal, wall cutting, and large repairs.
-
How long does a shower sealant take to cure?
It depends on the product, but most silicone sealants need about 24–48 hours to fully cure (no water use) for best results. Always check the label and keep the area dry while it sets.
-
How much water does a dripping shower waste?
Even a small drip can waste a lot. On average, a tap leaking one drip per second loses over 30 liters per week. A shower can waste even more. Fixing leaks quickly saves water and money on your bill.
-
What causes a shower tray to crack?
Cracks often come from impact (heavy object dropping), shifting foundation, or just age-related fatigue, especially if the tray isn’t well supported. Temperature changes and poor installation can also contribute.
-
How much does a professional shower leak repair cost?
Costs vary widely by location and severity. Simple fixes (re-caulking, tightening) might be done cheaply, while replacing a tray or major waterproofing could be $1000+. Always obtain a few quotes and ask for breakdowns.